Requirements: 4D Shipping
Introduction
4D Shipping is a toolkit that enables software developers to quickly and easily incorporate USPS shipping capabilities into their software applications and websites. When working with USPS you can …
- Schedule Pickups
- Track Packages
- Shop for Rates
- Verify Addresses
- Purchase Labels*
*When it comes time to purchase a label choose either Stamps.com or Endicia as your postage provider.
Getting Started
Depending on your specific shipping needs you will need one or more accounts from USPS, Endicia, and/or Stamps.com. All three types of accounts allow tracking, address verification, rate shopping, and scheduling pickups for packages. USPS no longer offers the ability to generate labels through their system. To generate a postage-paid label a different postage provider like Endicia or Stamps.com needs to be used. Details for signing up for these different accounts are below.
USPS Accounts
When the PostageProvider property is set to ppNone, a USPS account will need to be used. Account creation is free and provides developers with a username used when accessing shipping services.
- To create an account visit https://registration.shippingapis.com/.
Endicia Accounts
When PostageProvider is set to ppEndcia, an Endicia account will need to be used. During testing there is a sandbox account built into the components for your use. When ready to move to production a production account will need to be used.
-
To use the built-in sandbox account set the EndiciaTestMode configuration setting to either 1 or 2. The component will automatically create all requests as test requests and send them to the appropriate server.
Component.Config("EndiciaTestMode=1"); // Test request to Sandbox Server Component.Config("EndiciaTestMode=2"); // Test request to Production Server - To create a production account visit https://account.endicia.com/?referredBy=lsft.
Stamps.com Accounts
When PostageProvider is set to ppStamps, a Stamps.com developer account and Integration Id will need to be used.
- To create a developer account visit http://developer.stamps.com/developer/register/.
- To acquire an Integration Id please contact your Stamps.com contact or Stamps.com customer support team at sws-support@stamps.com.
Step-by-Step Walkthrough
This next section will walk through, step-by-step, the entire process from rate shopping to handing the package to the carrier for delivery. From the perspective of an imaginary online retailer, they may need to complete these steps after an order has been placed on their site.
- Get the customer’s shipping address (and optionally verify it with USPS).
- Allow the customer to choose what type of shipping to use, and show the cost and delivery time of each choice.
- Print a shipping label for the package.
- Provide the customer with a shipment tracking number.
- Schedule a mail carrier to pick up the package.
- Give the package to the carrier.
1. Get the customer’s shipping address (and optionally verify it with USPS).
After you get the customers shipping address, you may choose to verify that address with USPS. Address verification is not required, and most merchants do not need this feature. If you want to implement address verification, doing so will require special permission from USPS, and USPS will have to specifically activate the address information feature on your account.
The USPSAddress component allows you to verify a complete address, lookup a zip code of a city/state, and lookup the city/state of a zip code method. Here is an example of using the USPSAddress component to verify (“standardize”) an address:
Uspsaddress uspsaddress1 = new Uspsaddress();
uspsaddress1.USPSAccount.Server =
  "http://testing.shippingapis.com/ShippingAPITest.dll";
uspsaddress1.USPSAccount.UserId = userId;
uspsaddress1.USPSAccount.Password = password;

uspsaddress1.Address.Address1 = "6406 Ivy Lane";
uspsaddress1.Address.City = "Greenbelt";
uspsaddress1.Address.State = "MD";
uspsaddress1.ValidateAddress();

Console.WriteLine(uspsaddress1.Matches[0].Address1);
Console.WriteLine(uspsaddress1.Matches[0].City);
Console.WriteLine(uspsaddress1.Matches[0].State);
Console.WriteLine(uspsaddress1.Matches[0].ZipCode);
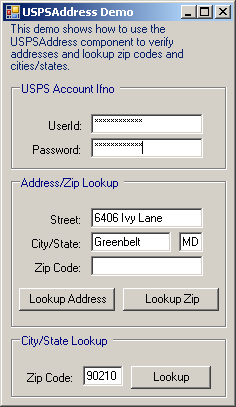
Here is the address I want to verify…
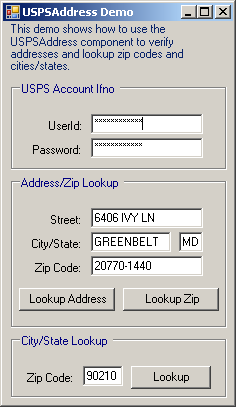
Now the address is verified and standardized.
2. Allow the customer to choose what type of shipping to use, show them the cost and estimated delivery time of each choice.
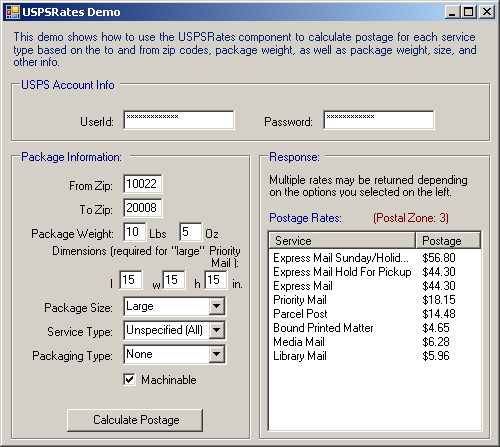
Now that you have a shipping address from the customer, you can retrieve the cost of delivery and an estimated time of delivery using the USPSRates component.
To determine the postage rate to ship a regular sized package from my zip code (27502) to the sample address used in the earlier example (20770), I can use the following code to obtain rates from either USPS or Endicia:
Uspsrates uspsrates1 = new Uspsrates();

//To choose the provider set the PostageProvider property. Default is USPS (None)
uspsrates1.PostageProvider = UspsratesPostageProviders.ppNone;

if (uspsrates1.PostageProvider == UspsratesPostageProviders.ppNone) //USPS
{
  uspsrates1.USPSAccount.Server =
    "http://production.shippingapis.com/ShippingAPI.dll";
  uspsrates1.USPSAccount.UserId = USPSUserId;
  uspsrates1.USPSAccount.Password = USPSPassword;
}
else //Endicia
{
  uspsrates1.USPSAccount.Server = EndiciaServerURL; //Provided by Endicia
  uspsrates1.USPSAccount.AccountNumber = EndiciaAccountNumber;
  uspsrates1.USPSAccount.Password = EndiciaPassword;
}

uspsrates1.SenderAddress.ZipCode = "27502";
uspsrates1.RecipientAddress.ZipCode = "20770";
uspsrates1.Packages.Add(new PackageDetail());
uspsrates1.Packages[0].Length = 2;
uspsrates1.Packages[0].Width = 2;
uspsrates1.Packages[0].Height = 2;
uspsrates1.Packages[0].Size = TPackages.psRegular;

if (uspsrates1.PostageProvider == UspsratesPostageProviders.ppNone) //USPS
{
  uspsrates1.Packages[0].Weight = "2 lbs 2 oz"; //Format of "N lbs N oz".
  //Return rates for all services.
  uspsrates1.RequestedService = ServiceTypes.stUnspecified;
}
else //Endicia
{
  uspsrates1.Packages[0].Weight = "2.1"; //Format of "N.N".
  //Endicia requires that you select a specific service
  uspsrates1.RequestedService = ServiceTypes.stUSPSExpress;
}

uspsrates1.GetRates();

for (int i = 0; i < uspsrates1.Services.Count; i++)
{
  Console.WriteLine("Service and Cost: "
    + uspsrates1.Services[i].ServiceTypeDescription
    + "\t" + uspsrates1.Services[i].ListNetCharge);
}
Note that package length, width, and height are required for large packages, but it is okay to send them for all package sizes
Rates depend on location (from and to), size and dimensions, weight, container (envelope, box, etc), and service type. (Package length width and height are not required for the psRegular package size, but it is okay to send them. They are required for all other package sizes).
Available service types:
- Express
- First Class
- Priority
- Parcel Post
- Bound Printed Matter
- Media
- Library
- Online
- Global Express
- Parcel Select
- Critical Mail
- Standard Mail
- Express Mail International
- First Class Mail International
- Priority Mail International
The ServiceType property has an “all” setting that will tell the component to retrieve rates for all available service types (not applicable when using Endicia as a ServiceType must be specified there).
Package sizes are defined by USPS as follows:
-
Regular, which is defined as:
Priority Mail: less than one cubic foot in size
All other service types: length plus girth is 84 inches or less -
Large, which is defined as:
Priority Mail: greater than one cubic foot in size
All other service types: length plus girth is between 85 and 108 inches. - Oversize, which is defined as having a length plus girth of between 109-130 inches.
To compute the shipping time, use the GetShippingTime method of the USPSRates component and simply provide the from zip, the destination zip, and the service type:
Uspsrates uspsrates1 = new Uspsrates();
uspsrates1.USPSAccount.UserId = USPSUserId;
uspsrates1.USPSAccount.Password = USPSPassword;
uspsrates1.USPSAccount.Server =
  "http://production.shippingapis.com/ShippingAPI.dll";

uspsrates1.RecipientAddress.ZipCode = "20770";
uspsrates1.SenderAddress.ZipCode = "27502";
uspsrates1.RequestedService = ServiceTypes.stUSPSExpress;

uspsrates1.GetShippingTime();

Console.WriteLine("It will take approximately " +
  uspsrates1.Days + " days to ship.");
3. Print a shipping label for the package.
Use one of the Ship components to generate a shipping label for your package. The components will generate labels in TIF, PDF, or GIF formats for your printing convenience. When using Endicia available formats are GIF, JPG, PDF, ZPL, and EPL. The Ship components consist of:
- USPSShip – use this to generate domestic shipping labels.
- USPSShipIntl – use this to generate shipping labels for international mail services and obtain customs forms.
For this example I’ll use the USPSShip component which can generate shipping labels for Express, Priority Mail, First Class Mail, Parcel Post, Bound Printer Matter, Media Mail, and Library Mail.
Uspsship uspsship1 = new Uspsship();

//To choose the provider set the PostageProvider property. Default is USPS (None)
uspsship1.PostageProvider = UspsshipPostageProviders.ppEndicia;

if (uspsship1.PostageProvider == UspsshipPostageProviders.ppNone) //USPS
{
  uspsship1.Config("Certify=true"); //Test labels with the live server.
  uspsship1.USPSAccount.Server =
    "https://secure.shippingapis.com/ShippingAPI.dll";
  uspsship1.USPSAccount.UserId = USPSUserId;
  uspsship1.USPSAccount.Password = USPSPassword;
}
else //Endicia
{
  uspsship1.USPSAccount.Server = EndiciaServerURL; //Provided by Endicia
  uspsship1.USPSAccount.AccountNumber = EndiciaAccountNumber;
  uspsship1.USPSAccount.Password = EndiciaPassword;
}

uspsship1.SenderContact.FirstName = "John";
uspsship1.SenderContact.LastName = "Smith";
uspsship1.SenderAddress.Address1 = "475 L'Enfant Plaza, SW";
uspsship1.SenderAddress.City = "Washington";
uspsship1.SenderAddress.State = "DC";
uspsship1.SenderAddress.ZipCode = "20260";

uspsship1.RecipientContact.FirstName = "Jane";
uspsship1.RecipientContact.LastName = "Smith";
uspsship1.RecipientAddress.Address1 = "8 Wildwood Drive";
uspsship1.RecipientAddress.City = "Old Lyme";
uspsship1.RecipientAddress.State = "CT";
uspsship1.RecipientAddress.ZipCode = "06371";

uspsship1.Packages.Add(new PackageDetail());

if (uspsship1.PostageProvider == UspsshipPostageProviders.ppNone) //USPS
{
  uspsship1.LabelImageType = UspsshipLabelImageTypes.sitTIF;
  uspsship1.Packages[0].ShippingLabelFile = "test_label.tif";
  uspsship1.Packages[0].Weight = "8 oz";
  uspsship1.LabelOption = "1";
  uspsship1.Packages[0].SignatureType = TSignatureTypes.stNoSignatureRequired;
}
else //Endicia
{
  uspsship1.CustomerId = "2322"; //Required for Endicia
  uspsship1.TransactionId = "ABCDEFGH"; //Required for Endicia
  uspsship1.LabelImageType = UspsshipLabelImageTypes.sitPNG;
  uspsship1.Packages[0].ShippingLabelFile = "test_label.png";
  uspsship1.Packages[0].Weight = "2.0";
}

uspsship1.ServiceType = ServiceTypes.stUSPSPriority;

uspsship1.GetPackageLabel();

Console.WriteLine(uspsship1.Packages[0].TrackingNumber);
After the call to GetPackageLabel, you’ll have a file that you can print, that looks something like the one pictured at right. Affix this label to your package along with postage and it is ready to go.

4. Provide the customer with a shipment tracking number.
The Ship component that you use in step 3 will provide you with a tracking number automatically. As above you can use the TrackingNumber field of the Packages collection to obtain this information.
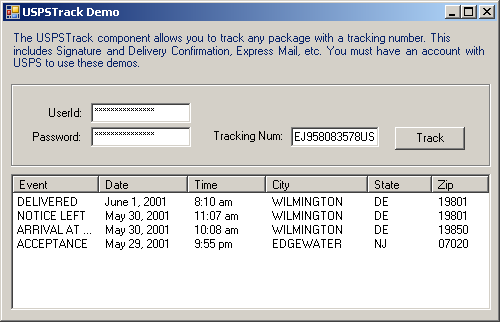
With this tracking number you can use the USPSTrack component to retrieve information about the status of the shipment. Certainly as far as the customer is concerned, they can just be directed to visit the USPS website and do their shipment tracking there. But the USPSTrack component would be particularly useful to the merchant for automatically confirming delivery of all packages sent. Here is an example using the test server and a working test tracking number:
Uspstrack uspstrack1 = new Uspstrack();
uspstrack1.USPSAccount.UserId = USPSUserId;
uspstrack1.USPSAccount.Password = USPSPassword;
uspstrack1.USPSAccount.Server =
  "http://testing.shippingapis.com/ShippingAPITest.dll";

uspstrack1.TrackShipment("EJ958083578US");

for (int i = 0; i < uspstrack1.TrackEvents.Count; i++)
{
  Console.WriteLine(uspstrack1.TrackEvents[i].Status + ": " +
  uspstrack1.TrackEvents[i].Date + ": " +
  uspstrack1.TrackEvents[i].City + ", " + uspstrack1.TrackEvents[i].State);
}
5. Schedule a mail carrier to pick up the package.
Now that the order process is complete, its time (hopefully) to actually ship the product to the customer. To do this, you can walk down to the post office with the package, or you can save yourself some time and automatically schedule a mail carrier to come and pick up the package from your door. To do this, use the USPSShip component to submit the package details and schedule a pickup via the SchedulePickup method.
First, check for the soonest available pickup date:
//This is the test server. Please note that the test requests are pre-scripted
//so modified requests may be rejected by the test server
Uspsship uspsship1 = new Uspsship();
uspsship1.USPSAccount.Server =
  "https://secure.shippingapis.com/ShippingAPITest.dll";
uspsship1.USPSAccount.UserId = USPSUserId;
uspsship1.USPSAccount.Password = USPSPassword;
uspsship1.SenderContact.Company = "ABC Corp.";
uspsship1.SenderAddress.Address1 = "1390 Market Street";
uspsship1.SenderAddress.Address2 = "Suite 777";
uspsship1.SenderAddress.City = "Houston";
uspsship1.SenderAddress.State = "TX";
uspsship1.SenderAddress.ZipCode = "77058-1234";
uspsship1.PickupAvailability();

Console.Write(uspsship1.ShipDate);
After calling the PickupAvailability method, the ShipDate property of the component will be populated with the date of the soonest available pickup date. If carrier pickup services are not supported for the merchant address, you’ll have to visit the post office in person.
Now you can call the SchedulePickup method to go ahead and schedule a carrier pickup. To do this, simply call the SchedulePickup() method. You’ll be required to first set some properties about the person requesting pickup and the package itself. The example below will work with the test server (note: this is the USPS “canned” test data so if you change it the test will no longer work).
//This is the test server. Please note that the test requests are pre-scripted
//so modified requests may be rejected by the test server
Uspsship uspsship1 = new Uspsship();
uspsship1.USPSAccount.Server = "https://secure.shippingapis.com/ShippingAPITest.dll";
uspsship1.USPSAccount.UserId = USPSUserId;
uspsship1.USPSAccount.Password = USPSPassword;
uspsship1.SenderContact.Company = "ABC Corp.";
uspsship1.SenderAddress.Address1 = "1390 Market Street";
uspsship1.SenderAddress.Address2 = "Suite 777";
uspsship1.SenderAddress.City = "Houston";
uspsship1.SenderAddress.State = "TX";
uspsship1.SenderAddress.ZipCode = "77058-1234";
uspsship1.SenderContact.FirstName = "John";
uspsship1.SenderContact.LastName = "Doe";
uspsship1.SenderContact.Phone = "(555) 555-1234";
uspsship1.Config("SenderPhoneExt=201");

//the number of packages being picked up for Express Mail
uspsship1.CountExpress = 1;
//the number of packages being picked up for Priority Mail
uspsship1.CountPriority = 1;
//the number of packages being picked up for International Mail
uspsship1.CountInternational = 1;
//other packages
uspsship1.CountOther = 1;

uspsship1.PackageLocation = UspsshipPackageLocations.plOther;
uspsship1.TotalWeight = 14; //pounds
uspsship1.Config("SpecialInstructions=Packages are behind the screen door.");
uspsship1.SchedulePickup();

Console.WriteLine(uspsship1.ShipDate);
In the above example, all of the data is required, as specified, in order to work with the test server. Once you have a live account and are ready to schedule a real pickup, change the Server URL to the production URL and specify only those properties that are required or that you need. For a list of required pickup scheduling properties please see the USPS documentation of the SchedulePickup method.
The USPSShip component also gives you the means to inquire as to the status of a pickup, change a previously scheduled pickup, or cancel a previously scheduled pickup.
6. Give the package to the carrier.
This is the easy part and requires no explanation. All done, happy shipping!
Conclusion
This article demonstrates the ease of use of the 4D Shipping. In this tutorial we went over some of the most commonly used components and uses, however if there are any questions not covered here please do not hesitate to contact us via the link at the bottom of this page.
A Note on Server URLs:
-
USPSAddress, USPSRates, and the USPSTrack component use the following servers:
live: http://production.shippingapis.com/ShippingAPI.dll
test: http://testing.shippingapis.com/ShippingAPITest.dll -
USPSShip and USPSShipIntl use the following servers:
live: https://secure.shippingapis.com/ShippingAPI.dll
test: https://secure.shippingapis.com/ShippingAPITest.dll
Note: You can create test labels with the live server by setting the Certify configuration setting (i.e. USPSShip1.Config(“Certify=True”);).