Requirements: 4D Shipping
Introduction
4D Shipping is a toolkit that enables software developers to quickly and easily incorporate UPS, FedEx, and USPS shipping capabilities into their software applications and websites. The toolkit includes components for shipping, tracking, address verification, and rate calculation. In this tutorial we will focus on support for UPS. The UPS components in the toolkit are:
- UPSAddress component: Checks U.S. shipping addresses (city, state, and zip code) and suggests alternates if an error is discovered.
- UPSShip component: Generates complete UPS domestic shipping labels, including addresses and barcodes, for single and multi-package shipments (MPS).
- UPSShipIntl component: Generates complete UPS international shipping labels, including addresses and barcodes, for single and multi-package shipments (MPS).
- UPSRates component: Programmatic access to UPS account courtesy rate quotes.
- UPSTrack component: Provides tracking information for shipments with multiple packages or a single package.
Getting Started
Signing up with UPS.
Before using these components, the user must contact UPS to obtain access to UPS OnLine Tools. For this, please visit http://www.ups.com/e_comm_access/gettools_index?loc=en_US and follow the steps as instructed on that page.
Please read the instructions carefully. You should register first, and after reviewing and accepting the UPS User Agreement, you should submit a request for an UPS OnLine Tools Developer’s Key. After the request has been submitted, your Developer’s Key will be emailed to the email address you provided to UPS during registration process.
After obtaining the Developer’s Key, you can then submit a request for the Access License Key (for XML tools). This will also be sent to you via email. Please save it as it is required to be used with all requests sent to any UPS server (via our component which utilizes UPS Online Tools). An Access Key provides access to UPS systems, which hold the information you or your customers need to ship, track, or rate a package. Your Developer’s Key lets you get UPS OnLine Tool documentation; the Access Key lets you actually implement UPS OnLine Tools.
You need only one Access Key for access to all UPS OnLine Tools. However, if multiple locations or departments will be accessing the Tools, a great way to monitor and assess usage is to have an Access Key per location. UPS recommends each site implementation of your EC (E-Commerce) solution have separate Access Keys. An example would be a company that is implementing the Tools into three parts of their organization in three different cities. In this case, it is recommended that you obtain three separate Access Keys to uniquely identify each site.
This is not to be shared with others outside your organization, nor is it to be packaged, distributed, or sold to any other person or entity. Sharing the security elements (UserId, Password, AccessKey, and Developer Key) with third parties is strictly prohibited as expressed in the UPS Developer Agreement.
Each request requires specific processing based on the type; therefore, each component has a unique URL for connection purposes.
Note: UPS, the UPS Shield trademark, the UPS Ready mark, the UPS OnLine Tools mark and the Color Brown are trademarks of United Parcel Service of America, Inc. All Rights Reserved.
Your typical online retailer needs to ship items to his customers, and this simple task involves several steps:
- Allow the customer to choose what type of shipping to use, and show the cost and delivery time of each choice.
- Print a shipping label for the package.
- Provide the customer with a shipment tracking number.
- Give the package to UPS.
Now here is how we can implement each of these tasks.
1. Allow the customer to choose what type of shipping to use, show them the cost and estimated delivery time of each choice.
After you get the customers shipping address, you can retrieve the cost of delivery and an estimated date of delivery using the Rates component.
To determine the rate to ship a UPS Letter/UPS Express Envelope from my zip code (92121) to a sample address (30006), I can use the following code:
Upsrates Rates1 = new Upsrates();
Rates1.UPSAccount.Server = "https://wwwcie.ups.com/webservices/Rate";
Rates1.UPSAccount.AccessKey = accessKey;
Rates1.UPSAccount.UserId = userId;
Rates1.UPSAccount.Password = password;
Rates1.UPSAccount.AccountNumber = accountNumber;
Rates1.SenderAddress.City = "San Diego";
Rates1.SenderAddress.State = "CA";
Rates1.SenderAddress.ZipCode = "92121";

Rates1.RecipientAddress.City = "Marietta";
Rates1.RecipientAddress.State = "GA";
Rates1.RecipientAddress.ZipCode = "30006";
Rates1.Packages.Add(new PackageDetail());
Rates1.Packages[0].PackagingType = TPackagingTypes.ptLetter;
Rates1.Packages[0].Weight = "1.0";
Rates1.RequestedService = ServiceTypes.stUnspecified;

Rates1.GetRates();

for (int i = 0; i < Rates1.Services.Count; i++)
{
  string NetCharge = "";
  if (Rates1.Services[i].AccountNetCharge != "") //If there is a negotiated rate
    NetCharge = Rates1.Services[i].AccountNetCharge;
  else
    NetCharge = Rates1.Services[i].ListNetCharge;

  Console.WriteLine(Rates1.Services[i].ServiceTypeDescription
        + " Delivery Date and Time: "
        + DateTime.Now.AddDays(Convert.ToInt32(Rates1.Services[i].TransitTime))
        + " " + Rates1.Services[i].DeliveryTime + " Charge: " + NetCharge);
}
Note that package weight is required to be provided in the request for each package contained in the shipment if PackagingType is set to a value other than 2 (ptLetter). It is only necessary to specify the dimensions of the package (length, width, and height – not shown in the example above) if you set the PackagingType to ptYourPackaging.
Rates depend on location (from and destination), dimensions and/or weight, packaging type (envelope, box, etc), and service type. Available service types are:
- Unspecified
- Next Day Air
- Express
- 2nd Day Air
- Ground
- Worldwide Express
- Worldwide Expedited
- Expedited
- Standard
- 3 Day Select
- Next Day Air Saver
- Saver
- Next Day Early AM
- Express Early AM
- Worldwide Express Plus
- Express Plus
- 2nd Day Air AM
- Today Standard
- Today Courier
- Today Inter-City
- Today Express
- Today Express Saver
The RequestedService property has an “unspecified” setting that will tell the component to retrieve rates for all available service types.
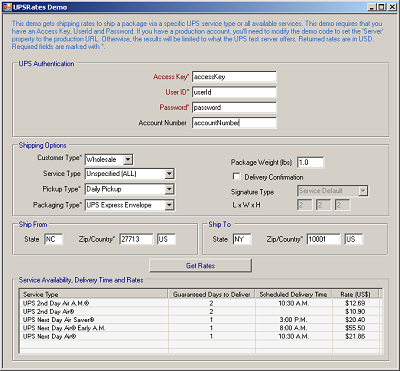
As you can see from the above screenshot of the Rates demo that comes with the UPS Integrator .Net Edition, when the service type is unspecified, UPS will return rate quotes for all applicable service types (Next Day, 2 day, etc). The delivery date, charges, discounts, and other details about the rate quotes are contained in a set of Service fields like Services[i].DeliveryTime, etc.
2. Print a shipping label for the package.
Use the UPSShip component to generate a shipping label for your package. The component will generate labels in GIF, EPL, SPL, ZPL, and Star formats. Choose the label image type through the LabelImageType property. The UPSShip component can generate labels for all service types.
Upsship ship = new Upsship();
ship.UPSAccount.Server = "https://wwwcie.ups.com/webservices/Ship";
ship.UPSAccount.AccessKey = accessKey;
ship.UPSAccount.UserId = userId;
ship.UPSAccount.Password = password;
ship.UPSAccount.AccountNumber = accountNumber;
ship.LabelImageType = UpsshipLabelImageTypes.uitGIF;
ship.Packages.Add(new PackageDetail());
ship.Packages[0].PackagingType = TPackagingTypes.ptPak;
ship.Packages[0].Weight = "2.0";
ship.Packages[0].ShippingLabelFile = "shipping_label.gif";
ship.SenderContact.Company = "sender company & such";
ship.SenderContact.FirstName = "sender name & such";
ship.SenderContact.Phone = "9195447070";
ship.SenderAddress.Address1 = "600 Market St";
ship.SenderAddress.Address2 = "Suite 300";
ship.SenderAddress.City = "Chapel Hill";
ship.SenderAddress.State = "NC";
ship.SenderAddress.ZipCode = "27516";
ship.RecipientContact.Company = "recipient company & such";
ship.RecipientContact.FirstName = "recipient name & such";
ship.RecipientContact.Phone = "0000000000";
ship.RecipientAddress.Address1 = "123 Bishop Road";
ship.RecipientAddress.City = "Honolulu";
ship.RecipientAddress.State = "HI";
ship.RecipientAddress.ZipCode = "96819";
ship.GetShipmentLabels();
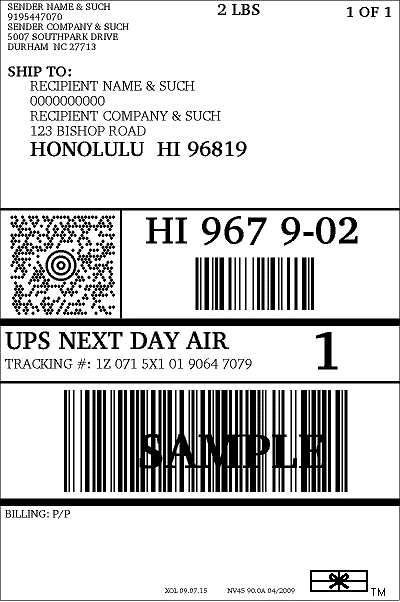
After the call to GetShipmentLabels, you’ll have a file called shipping_label.gif (depending on how you set the ShippingLabelFile and LabelImageType properties) that you can print, which looks something like the one pictured above. Affix this label to your package and it is ready to go.
In addition the properties below will be populated giving you information about the generated label(s).
- MasterTrackingNumber (if the shipment was a Multi-Package Shipment)
- Packages[i].TrackingNumber
- Packages[i].ShippingLabel
- Packages[i].TotalSurcharges
- Packages[i].NetCharge
- Packages[i].BaseCharge
The UPSShip component is extremely flexible and provides a wide variety of properties that can be set to effect the generated label itself.
Shipping Payment Options
Payment options can be specified using the UPSShip component’s Payor property. Specifically, the payment type is set with the Payor.PayorType property, which can take 1 of 3 possible values:
- Sender – The default, using this option means that the account identified by the UPSAccount.AccountNumber property will be billed for the shipping charges.
- Recipient – The recipient of the package will be billed for the shipping charges. To ship this way, you’ll need to know the recipients account number and specify it in the Payor.AccountNumber property, along with the Payor.CountryCode and Payor.ZipCode.
- Third Party – A third party will be billed for the shipping charges. To ship this way, you’ll need to know an account number and specify it in the Payor.AccountNumber property, along with the Payor.CountryCode and Payor.ZipCode.
COD – Collect On Delivery
For COD shipments, you can set the Packages[i].CODType and Packages[i].CODAmount properties to specify the Amount. With COD, the recipient is paying for the product being shipped rather than the shipping itself.
Signature Options
Signature options can be specified in the UPSShip component by setting the Packages[i].SignatureType property. The property has 6 possible values:
- ServiceDefault – The default value for the requested service.
- Adult – Delivery confirmation adult signature required.
- Direct – Delivery confirmation signature required.
- Indirect – Not valid for UPS.
- NoSignatureRequired – Delivery confirmation no signature required.
- USPSDeliveryConfirmation – USPS delivery confirmation.
Note: Delivery Confirmation and COD cannot coexist on a single package and Delivery Confirmation option cannot be combined with the Return Services option. Also, USPSDeliveryConfirmation is available for UPS Mail Innovations only.
International Shipments
The UPSShipIntl component is similar to the UPSShip component with a few additional properties for Commodities and other international specific properties. The UPSShipIntl component has a Commodities collection where you can add a new Commodity and specify the Description, Weight, etc. You’ll need to use these properties to build your ship request if you are shipping internationally. Please consult the help files for more details about different properties that are required under different conditions.
Also required for dutiable shipments is the DutiesPayor property. This property should be set to indicate who will be paying the duty for the shipment – the sender, the recipient, or a third party.
3. Provide the customer with a shipment tracking number.
The UPSShip component that you use in step 3 will provide you with a tracking number automatically. The component has a MasterTrackingNumber property where this information is provided after the call to GetShipmentLabels returns if the shipment was a MPS shipment. Individual package tracking numbers can be obtained by checking the Packages[i].TrackingNumber property
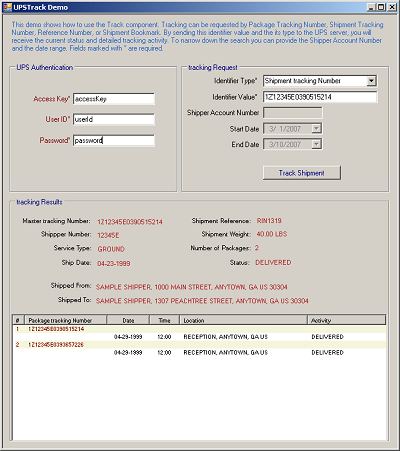
With this tracking number you can use the UPSTrack component of the toolkit to retrieve information about the status of the shipment. Certainly as far as the customer is concerned, they can just be directed to visit the UPS website and do their shipment tracking there. But the UPSTrack component would be particularly useful to the merchant for automatically confirming delivery of all packages sent. Here is an example:
Upstrack track = new Upstrack();
track.UPSAccount.Server = "https://wwwcie.ups.com/webservices/Track";
track.UPSAccount.AccessKey = accessKey;
track.UPSAccount.UserId = userId;
track.UPSAccount.Password = password;
track.UPSAccount.AccountNumber = accountNumber;
track.ShipDateStart = "20010219"; //yyyMMdd
track.ShipDateEnd = "20010228"; //yyyMMdd
track.IdentifierType = UpstrackIdentifierTypes.uitMasterTrackingNumber;

track.TrackShipment("1Z12345E0390515214");

for (int i = 0; i < track.PackageCount; i++)
{
  //Here you can check properties for the package
  track.PackageIndex = i;
  Console.WriteLine("******* Next Package Info*******");
  Console.WriteLine(track.PackageMessage + ": " + track.PackageTrackingNumber);
  Console.WriteLine("Number of tracking events for this package: "
    + track.TrackEvents.Count + "\r\n");

  //For each scan for the package
  for (int j = 0; j < track.TrackEvents.Count; j++)
  {
    //Here you can check details about individual package scan activity
    Console.WriteLine(track.TrackEvents[j].Location);
    Console.WriteLine(track.TrackEvents[j].City);
    Console.WriteLine(track.TrackEvents[j].State);
    Console.WriteLine(track.TrackEvents[j].Date);
    Console.WriteLine(track.TrackEvents[j].Time);
    Console.WriteLine(track.TrackEvents[j].Status);
    }
  }
}
4. Give the Package to UPS.
Now that the order process is complete, its time (hopefully) to actually ship the product to the customer. The procedure for getting your package into the hands of UPS depends on how you send your packages. This could be a daily pickup from UPS, a dropoff at a UPS store, etc. All done, happy shipping!
Conclusion
This article demonstrates the ease of use of the 4D Shipping. In this tutorial we went over some of the most commonly used components and uses, however if there are any questions not covered here please do not hesitate to contact us via the link at the bottom of this page.
Notes:
- AccessKey, UserId, AccountNumber and Password properties are required for UPS transactions.
- The test server URL for depends on the component you are using. Check the documentation for the UPSAccount.Server property to determine the correct URL for the component you are using.
- The live production URL will be provided to you by UPS when you subscribe for UPS OnLine Tools.