Requirements: 4D QuickBooks Integrator, QuickBooks Web Connector
Contents
Introduction
The QBWCServer component is designed to process requests from QuickBooks Web Connector and fire events that allow you to provide information to, and get information from QuickBooks.
This allows you to create an application that can communicate with a remote copy of QuickBooks without worrying about directly accessing the machine where QuickBooks is running. For more information on the design of this approach refer to the Intuit website for QuickBooks Web Connector.
QWC Files
The first step in establishing a relationship between your application and a remote instance of QuickBooks is to generate a QWC file. This file specified information about your application, its requirements, as well as the access you need. The CreateQWCFile method creates the QWC file which must be generated for each user of your application. The minimum required properties are:
- AppDescription – A brief description of the application.
- AppName – The name of the application.
- AppSupportURL – A URL where users can find support for your product.
- AppURL – The URL of your web application.
- FileId – GUID stored as an extension to the company record in QuickBooks along with the OwnerId.
- OwnerId – GUID which identifies your application.
- User – The name your user must use to access your web service.
In order to create this QWC file, simply set the corresponding properties and call the CreateQWCFile method. Below is some sample code to do this using sample values:
Qbwcserver qbwcserver1 = new Qbwcserver();
qbwcserver1.QWCFileInfo.AppDescription = "A short description for WCWebService.asmx";
qbwcserver1.QWCFileInfo.AppName = "WCWebService1";
qbwcserver1.QWCFileInfo.AppSupportURL = "http://developer.intuit.com";
qbwcserver1.QWCFileInfo.AppURL = "http://localhost/WCWebService/WCWebService.asmx";
qbwcserver1.QWCFileInfo.FileId = "{90A44FB5-33D9-4815-AC85-BC87A7E7D1EB}";
qbwcserver1.QWCFileInfo.OwnerId = "{57F3B9B1-86F1-4fcc-B1EE-566DE1813D20}";
qbwcserver1.QWCFileInfo.User = "qbtest1";
qbwcserver1.CreateQWCFile("C:/temp/test.qwc");
The resulting qwc file will look something like this:
<?xml version="1.0"?>
<QBWCXML>
<AppName>WCWebService1</AppName>
<AppID></AppID>
<AppURL>http://localhost/WCWebService/WCWebService.asmx</AppURL>
<AppDescription>A short description for WCWebService.asmx</AppDescription>
<AppSupport>http://developer.intuit.com</AppSupport>
<OwnerID>{57F3B9B1-86F1-4fcc-B1EE-566DE1813D20}</OwnerID>
<FileID>{90A44FB5-33D9-4815-AC85-BC87A7E7D1EB}</FileID>
<UserName>qbtest1</UserName>
<QBType>QBFS</QBType>
<IsReadOnly>false</IsReadOnly>
<Notify>false</Notify>
<PersonalDataPref>pdpNotNeeded</PersonalDataPref>
<UnattendedModePref>umpOptional</UnattendedModePref>
</QBWCXML>
Once this file is generated, the end user will obtain the file from your website and you will assign a password for the user at that time. The password is not part of the QWC file but the user will provide this directly in QuickBooks Web Connector and it will be sent to your web application during the connection for verification purposes.
To add the qwc file to the QuickBooks Web Connector, simply select ‘File’ -> ‘Add an Application…’ and navigate to the file. You will then be prompted to authorize the new web service as seen in the following window:
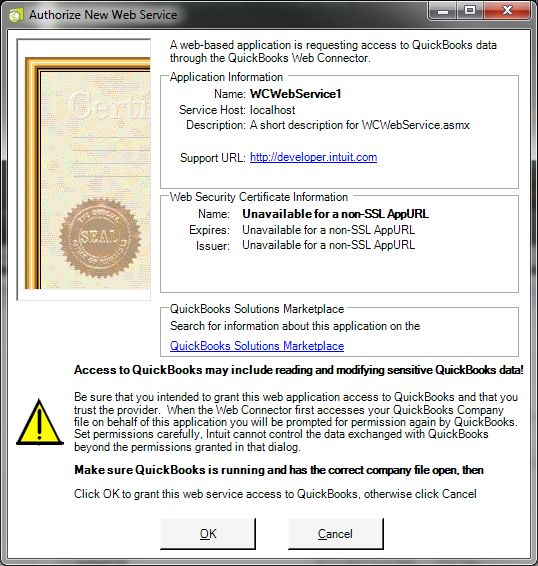
After this is done, the web service should show in the QuickBooks Web Connector’s list of applications. All that is left to do is enter the password. Then, simply select the application via the checkbox on the left side of the screen and click the ‘Update Selected’ button to connect to the service.

Processing Requests
The component is designed with a server environment in mind. That is, it’s typical that the component will be used in a web page, but it not required. However the HTTP request is received, it can be passed to the RequestData property. After passing the request data to the component call ProcessRequest method processes the request from QuickBooks Web Connector. Processing the requests will fire on of the events.
The component provides various events to interact with QuickBooks Web Connector. QuickBooks Web Connector will make a sequence of calls for any given session, and the events correspond to these calls. Within the events you control the response which dictates what QuickBooks Web Connector will do next.
A session ticket is provided so you can keep track of a particular session over the course of multiple calls. An example of a typical session:
-
ServerVersion fires. This allows you to provide the version of your application. This is purely informational and is not required to be implemented.
void Qbwcserver1_OnServerVersion(object sender, QbwcserverServerVersionEventArgs e) { e.Version = "9.0.1523"; } -
ClientVersion fires. This provides version information about the QuickBooks Web Connector. It may be used to reject a connection based on minimum required versions, but in most cases no action would be taken in your code and the session proceeds. If your web service doesn’t handle the optional ClientVersion event, QBWC proceeds to the authenticate call.
void Qbwcserver1_OnClientVersion(object sender, QbwcserverClientVersionEventArgs e) { // Log("Client Version: " + e.ClientVersion); } -
Authenticate fires. This event allows verification of the user that is connecting. Here you will either accept or reject the connection.
void Qbwcserver1_OnAuthenticate(object sender, QbwcserverAuthenticateEventArgs e) { // Check user and password provided by web connector if (e.User.Equals("test") && e.Password.Equals("test")) { // Passed Authentication :) e.Accept = true; // The session ticket is generated by the component, but can be overwritten. // e.SessionTicket = "{" + Guid.NewGuid().ToString() + "}"; } else { e.Accept = false; } } -
SendRequest fires. Within this event you will supply a QBXML request that will be passed to QuickBooks.
void Qbwcserver1_OnSendRequest(object sender, QbwcserverSendRequestEventArgs e) { // It is in this method that you will determine if there is a request that needs // to be sent to QuickBooks. To do this, fill in the component as you normally // would, set the QBXMLRequestMode to rmOffline, and execute the method. The // aggregate of the request will be in the QBXMLRequestAggregate property. // if (there are pending requests for this session) // { Objsearch search1 = new Objsearch(); search1.QueryType = ObjsearchQueryTypes.qtCustomerSearch; search1.QBRequestMode = ObjsearchQBRequestModes.rmOffline; search1.Search(); e.Request = search1.QBRequestAggregate; // } } -
ReceiveResponse fires. QuickBooks Web Connector returns the QBXML response from the request you gave it in the previous step, or error information about why the request failed.
void Qbwcserver1_OnReceiveResponse(object sender, QbwcserverReceiveResponseEventArgs e) { // Response data has been received from the QuickBooks Web Connector Objsearch search1 = new Objsearch(); search1.QueryType = ObjsearchQueryTypes.qtCustomerSearch; search1.QBResponseAggregate = e.Response; // Deal with response data as needed. // Not done yet? Set percentage to tell QBWC that you have more requests. // e.Percentage = 50; } -
CloseConnection fires. This is the last even in the session. You may provide a message that will be displayed in QuickBooks Web Connector, but in most cases you would not take any action in this event.
void Qbwcserver1_OnCloseConnection(object sender, QbwcserverCloseConnectionEventArgs e)
{
  // Log("Session closed: " + e.SessionTicket);
}
Preparing Requests and Parsing Responses
The SendRequest event requires that you provide a QBXML request. This can be generated using the other components in this toolkit. To do so, simply set the QBRequestMode property to rmOffline before making a method call. For instance:
Customer customer = new Customer();
customer.QBRequestMode = CustomerQBRequestModes.rmOffline;
customer.GetByName("John Doe");
e.Request = customer.QBRequestAggregate;
In the above code, the component is used in the same way you would use the component if you were communicating directly with QuickBooks with the exception that QBRequestMode is set to rmOffline. When the GetByName method is called, instead of attempting to communicate with QuickBooks, only the QBRequestAggregate property is populated. This QBXML aggregate should be passed to the e.Request parameter inside the SendRequest event.
Processing responses is similar. You will receive the QBXML response from the e.Response parameter inside the ReceiveResponse event. You may then pass the response to the QBResponseAggregate property, or InputQBXML method of other components in the toolkit. For instance:
Customer customer = new Customer();
customer.QBResponseAggregate = e.Response;
string myAccountNumber = customer.AccountNumber;
Setting the QBResponseAggregate and calling InputQBXML do the exact same thing. The component parses the response and populates the properties of the component.
Error Handling
There are two basic types of errors when dealing with QuickBooks Web Connector. The first are errors that originate from your application and are reported to QuickBooks Web Connector. These are driven by the actions you take inside events. For instance, in the SendRequest event, you may set e.Request to empty string to signift an error. QuickBooks Web Connector will see this and make another call and the GetLastError event will fire. GetLastError is fired when QuickBooks Web Connector is asking for error information from your application. Here you may provide details about the error.
The second type of error is a communication error between QuickBooks Web Connector and QuickBooks itself. When this happens, QuickBooks Web Connector will make a call and the ConnectionError event will fire with information about the error received from QuickBooks.
Conclusion
This article showed how to get started with the QuickBooks Web Connector. It went over the basics that you need to get started, but it’s recommend that you also take a look at the documentation of the QBWCServer component that comes installed with the 4D QuickBooks Integrator, as it goes into details about all available properties of the component, including some that were not discussed here.